Exposing Home Assistant using Cloudflare Tunnel
I use the wonderful Home Assistant on our home network for a variety of weird and wonderful automations and as a nice dashboard to all the devices in our home.
Nothing on my home network can be reached from the outside world without a VPN. Unfortunately, that presents a few issues with Home Assistant:
- Accessing the Home Assistant UI from out-and-about is a pain.
- The Home Assistant app can’t report useful information such as location data unless the device is connected to the VPN.
- There are a number of integrations which use webhooks or similar to communicate data to your HA instance.
So far, I’ve been living with these problems. Exposing my entire HA instance to the world isn’t something I’m comfortable with.
There is a solution for this in the form of Home Assistant Cloud - a paid solution from the creators of Home Assistant.
If you’re not comfortable with your networking and security knowledge, stop here and go ahead and subscribe to Home Assistant Cloud. It’s very good and a great way to support Home Assistant.
If you’re interested in managing a solution for this yourself, read on.
Cloudflare’s ‘Argo Tunnel’ product has been around for a while, providing a tool to create a secure tunnel from any network in to the Cloudflare network, but they’ve recently rebranded it to Cloudflare Tunnel and made it free to everyone.
Here’s how I set it up to expose my Home Assistant instance.
Before you start, you’ll need a domain set up with DNS managed by Cloudflare.
Use cloudflared to configure a tunnel
On your home server, use the cloudflared utility to login to Cloudflare and download a certificate.
I use the cloudflared docker container, so to do this:
-
Create a folder for your
cloudflaredconfiguration to live, I use/etc/cloudflaredon the host. -
Run:
docker run --rm -it \
 -v "/etc/cloudflared:/home/nonroot/.cloudflared" \
 --user 1000:1000 \
 cloudflare/cloudflared:2021.4.0 \
 tunnel login
Replacing
--user 1000:1000with a user/group ID that has access to read and write from your/etc/cloudflareddirectory.This will provide you with a link to follow to authorise with Cloudflare and to choose a domain to authorise. Once that’s done,
cloudflaredwill downloaded the generated certificate and place it in your mounted volume at/etc/cloudflared. -
Create your tunnel:
docker run --rm -it \
 -v "/etc/cloudflared:/etc/cloudflared" \
 --user 1000:1000 \
 cloudflare/cloudflared:2021.4.0 \
 tunnel create homeassistant
This will create a new tunnel named
homeassistantand drop a config file for it in your configuration directory. -
Create a configuration file to route your tunnel to your Home Assistant instance. In
/etc/cloudflared/config.yml:--- url: homeassistant:8123 tunnel: 12345678-9012-3456-7890-123456789012 credentials-file: /etc/cloudflared/12345678-9012-3456-7890-123456789012.jsonreplacing the
tunnelID andcredentials-filewith a reference to the config file you got from step 3, and replacing theurlwith the URL for your Home Assistant instance.
Set up a DNS record for the tunnel
In the Cloudflare DNS panel, add a new CNAME from the subdomain you want your instance to be accessible at, to 12345678-9012-3456-7890-123456789012.cfargotunnel.com - where the ID in the target is the same as the tunnel ID you created previously.

Start the tunnel
You’ll need some way to start your tunnel and keep it running - I’m doing this using docker-compose, with a docker-compose.yml that looks a bit like:
version: '3.9'
services:
  cloudflared:
    image: cloudflare/cloudflared:2021.4.0
    user: 1000:1000
    volumes:
      - "/etc/cloudflared:/etc/cloudflared"
    command: "tunnel --config /etc/cloudflared/config.yml run homeassistant"
Run docker-compose up -d to bring up the tunnel.
Configuring access
The first thing we need to do is give Cloudflare a way to authenticate you so we can make sure access is restricted.
- Head over to the Cloudflare Teams Dashboard to start configuring access to your tunnel.
- Start at Configuration -> Authentication.
- Click ’+ Add’ next to Login methods to add your first login method.
- The easiest to get started with here is ‘One-time PIN’, so choose and enable that.
Next up, we need to configure the tunnel to use this login provider:
- Go to Access -> Applications on the left
- Click ‘Add an application’ and choose ‘Self-hosted’ from the options.
- Give your application a name and provide the domain you set up previously.
- In the next step, create a rule for ‘Emails’ which includes your email address:

- Leave the ‘setup’ settings as they are and finalise setup.
Once this is done, you should be able to visit the domain you’ve setup where you’ll be prompted to follow the One-time PIN sign in process. If the entered email matches the one you provided in your rule, you’ll have remote access to your Home Assistant instance!
Exposing webhooks
Many Home Assistant integrations expose a webhook URL to allow external applications (and mobile apps) to update sensors. These applications won’t be able to negotiate through the Cloudflare Access authentication process, so to work around this we’ll add a bypass rule specifically for webhooks.
- Create another application as above, but when prompted for the application domain, enter
/api/webhook/*in the path:

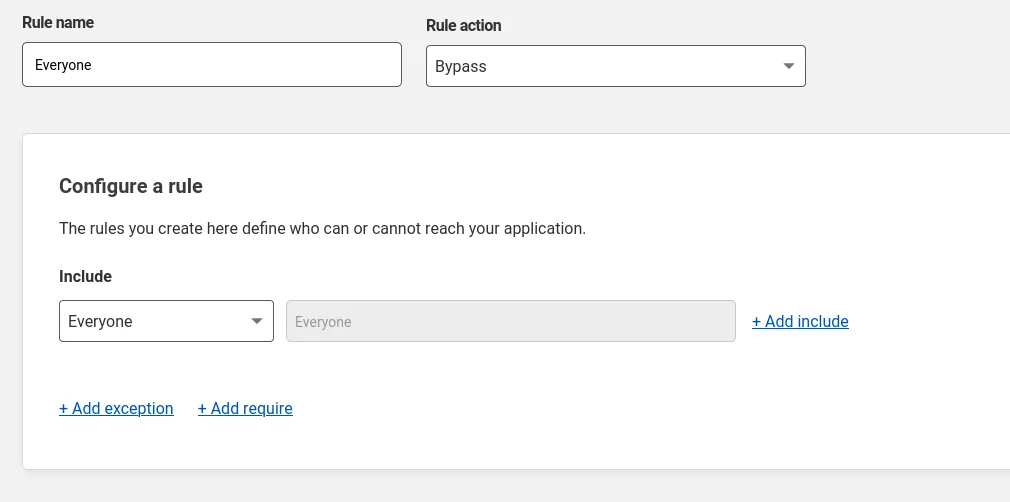
- When setting rules, create a rule with the ‘Rule action’ set to Bypass’ and an ‘Include’ rule set to ‘Everyone’. This will allow anonymous users to bypass authentication.

Many webhooks are now configured automatically by Home Assistant. To make sure they point to the tunnel URL rather than your internal URL, head over to Configuration -> General in your Home Assistant UI and set the ‘External URL’ value to that of the tunnel you’ve set up.
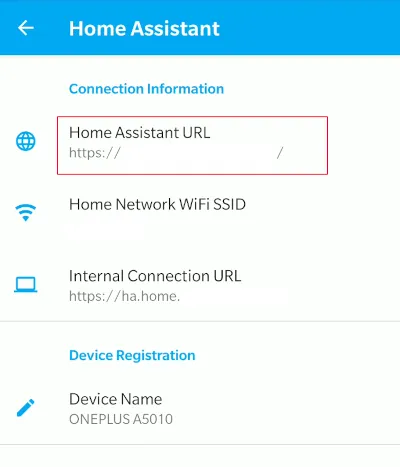
To set up your Home Assistant mobile app to route sensor data through the tunnel, you’ll need to set up a separate URL for external and internal use. On Android, this is done by setting the Home Assistant URL setting to the external/tunnel URL, and the Internal Connection URL to the URL you use while connected to the networks listed in Home Network WiFi SSID:

I’m still experimenting with this so this solution isn’t entirely complete. It works to help limit the exposure of your Home Assistant instance, but it isn’t perfect:
- Some integrations don’t use webbooks as a means to communicate with HA, so you may find you need to expose different URLs - this isn’t typically well documented so you’ll need to dive in to the code to figure out what you need to configure.
- You’re still exposing part of your Home Assistant instance to the world - if there’s a vulnerability exploitable through the webhook endpoint, this won’t help you.
- The dashboard in the Home Assistant app won’t work with Cloudflare Access in front of it.
- Home Assistant Cloud is better, easier, and super cheap. Go and sign up.